OOF2: The Manual
| 3.7. Skeleton | ||
|---|---|---|

|
Chapter 3. Task Pages |  |
An OOF2 Skeleton is a bare-bones object containing geometric
information about a Mesh. It is composed of Elements, Nodes,
and Segments. It also includes boundaries (PointBoundary
and EdgeBoundary)
where Mesh boundary conditions will be applied.
A Skeleton is in essence a discretized geometric representation of
Microstructure. A Mesh is created by adding muscles (material
properties) and internal organs (mathematical properties) onto a
Skeleton. Thus, the validity of a Mesh is critically dependent
on how faithfully its Skeleton has been adapted to the Material
(pixel) boundaries present in its Microstructure.
This Skeleton Page contains all the tools that are used in
creating, managing, and modifying Skeletons so that they conform
to material boundaries.
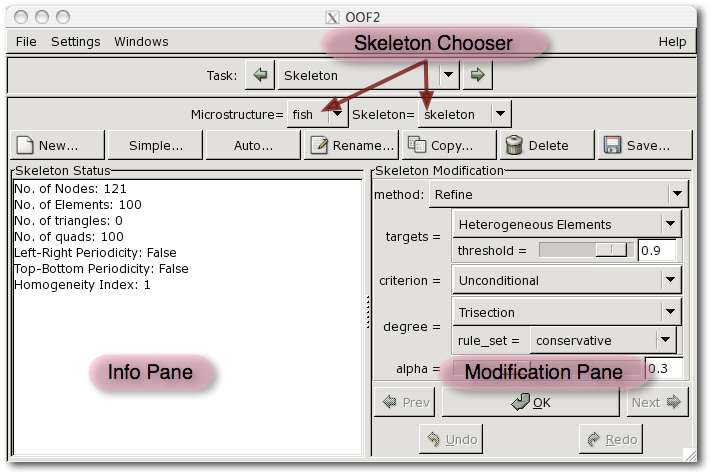
The layout of the Skeleton Page follows that of the Image and Pixel Selection
pages. At the top of the page is a Skeleton Chooser, which
selects the Skeleton to which the operations on the page apply.
Like the Image Chooser
on the Image Page,
the Skeleton Chooser is in two parts. The first part chooses a
Microstructure, and the second part chooses one of the Skeletons within
it.
Below the Skeleton Chooser is a row of buttons for performing
common Skeleton operations. The first three buttons create
Skeletons, and set the Skeleton Chooser to the newly created Skeleton:
-
The button creates a new
Skeletonwith a given number ofElements. TheSkeletonwill be created in theMicrostructurespecified by the first part of the Skeleton Chooser. TheSkeletonwill have a uniform rectangular array ofElements, and theElementswill not have any relationship to theMaterialboundaries in theMicrostructure. It will almost certainly be necessary to modify theSkeletonfor it to be a good representation of theMicrostructure. -
The button creates a new
Skeletonin which each pixel of theMicrostructureis divided into one quadrilateral or two triangularElements. TheSkeletonwill be created in theMicrostructurespecified by the first part of the Skeleton Chooser. ASkeletoncreated in this way already matches theMaterialboundaries in theMicrostructure, so it doesn't need any modification. However, it probably creates far more elements than are necessary to represent theMicrostructureand also includes unphysical jagged edges. -
The button creates a new
Skeletonand automatically refines it to fit theMicrostructure, using a predefined set of operations. This set may not be suitable for allMicrostructures, but it often does a very good job.
The remaining buttons act on the Skeleton currently selected in
the Skeleton Chooser:
-
The button renames the current
Skeletonand leaves it selected in the Skeleton Chooser. -
The button makes a copy of the current
Skeleton. The copy becomes the new currentSkeleton. -
The button deletes the current
Skeletonand allMeshesassociated with it. It does not otherwise affect theSkeleton'sMicrostructure. -
The button saves the current
Skeletonin a file. (The button is exactly the same as the Save/Skeleton command in the File menu, except that the button operates on theSkeletonnamed in the Skeleton Chooser, and the File command can save anySkeleton.)
The Skeleton Modification Pane contains tools for modifying a
Skeleton so that it follows the Material and pixel
group boundaries in its Microstructure. See the discussions
of the OOF.Skeleton.Modify command
and the SkeletonModifier
subclasses to learn about the specific tools.
At the top of the pane (see Figure 3.13) is a Chooser (marked method) for picking a modification method. The parameters of the method appear below it. Below that are five buttons:
-
The button applies the selected modifier to the current
Skeletonby invoking the OOF.Skeleton.Modify command. -
The and buttons undo and redo the latest
Skeletonmodifications. -
The and buttons cycle the method chooser through the recently applied methods. They have no direct effect on the
Skeleton.
|
|
 |
|
| 3.6. Materials |  |
3.8. Pin Nodes |