OOF2: The Manual
| 3.3. Image | ||
|---|---|---|

|
Chapter 3. Task Pages |  |
Images are the way in which the geometry of a microstructure
is imported into OOF2. Each Microstructure object can contain any
number of Image objects. The Image Page contains buttons for adding
and removing Images from Microstructures, tools for
modifying Images within Microstructures, and an information area.

The Image Chooser at the top of the page identifies the Image
(a.k.a. the current Image) that the rest
of the page operates upon. Because Images are contained in Microstructures,
there are two parts to the Image Chooser: one for selecting a
Microstructure and one for selecting one of the Images within it.
The buttons below the Image Chooser perform some basic operations.
-
The button loads a new
Imageinto an existingMicrostructure. (To create a newMicrostructurefrom a newImageuse the button on the Microstructure Page.) -
The button copies the current
Imageinto a new or existingMicrostructure. Clicking the button brings up a dialog box, show in Figure 3.4. A new or existingMicrostructurename can be entered in the area labelled microstructure, or a list of existing names can be accessed through the pull down menu to the right.Figure 3.4. The Copy Image Dialog Box
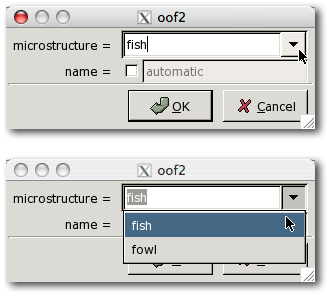
Two views of the dialog box for copying
Images. The upper view shows the box as it first appears, when aMicrostructurename can typed in. Clicking on the button below the mouse brings up a list of existingMicrostructures, as shown in the lower view.
-
The , , and Save buttons all operate on the current
Image. Images can be saved in any file format recognized by the ImageMagick library. -
The button creates pixel groups for each color of pixel in the
Image. If anImagecontains only a few colors, this can be a quick way of differentiating pixels in theMicrostructure. Be sure to read the caveats in the discussion of the OOF.Image.AutoGroup command, though.
The Image Information Pane displays information about the
current Image, including its sizes
and any comments that might have been stored within the image
file.
The Image Modification Pane contains tools for modifying
Images. It consists of two parts: a Modifier Chooser which
selects the modification tool, and a set of buttons.
The Modifier Chooser is a pull-down menu. Its entries
correspond to the commands in the OOF.Image.Modify menu. If the selected
modifier takes arguments, widgets for setting those arguments
appear just below the Modifier Chooser. The
image argument for all the commands is
always set to the Image currently selected in the Image
Chooser.
The button applies the selected
modifier to the current Image. The
and
buttons below it undo and redo the modification. The
and
buttons don't have any effect on the Image, they just cycle
the Modifier Chooser through the previously applied
modifications.
|
|
 |
|
| 3.2. Microstructure |  |
3.4. Pixel Selection |