OOF2: The Manual
| Chapter 2. OOF2 Concepts | ||
|---|---|---|

|
 |
|
Table of Contents
This chapter briefly describes the various types of objects used by OOF2. For more details, see the discussions in Chapter 3 and in the menus and menuitems in Chapter 6.
OOF2 has no built in system of units. Enter data in any set of units that you prefer, and the output will be in those units. Of course, at NIST we prefer that you use SI units (kilograms, meters, and seconds, etc.), but if you use slugs, furlongs, and fortnights instead, OOF2 will not complain.
OOF2 is an object oriented program. The term “object oriented” (commonly abbreviated “OO”) means different things to different people. For the purpose of understanding this manual, it's only necessary to understand what we mean when we refer to “objects”, “classes”, and “subclasses”.
OO programming involves writing descriptions of things, such as finite elements, or colors. A class describes the data associated with a thing and the functions that operate on that data. For example, a color class could contain storage for the red, green, and blue components, functions for setting those components, and a function for returning the equivalent gray value. The class only provides the description, though. To actually create a color, it's necessary to actually allocate space for the data and store it in a variable somewhere. In the jargon, this is called instantiating an object (or instance) of the class.
Classes often describe a variety of different but related
things. For example, a finite element could be a triangle or
a quadrilateral. Related classes can be arranged
hierarchically, with a generic base class
(e.g,
Element) and specific
subclasses
(e.g,
Triangle and
Quadrilateral). Subclasses can share
some data and functions with their parent base class, and
provide their own versions of others.
In this manual, the names of classes and subclasses appear in
this typeface.
The fundamental objects that OOF2 manipulates, Microstructures,
Images, Skeletons, Meshes, and SubProblems, are nested
(see Figure 2.1). Microstructures contain
Images and Skeletons, and Skeletons contain Meshes. Meshes
are divided into SubProblems. The objects are all given
identifying names when they're created. These names are
assigned by the user, or generated automatically by the program
if the user declines to specify a name. Names must be unique:
no two Microstructures can have the same name, and within a Microstructure
no two Images can have the same name.
![[Note]](IMAGES/note.png) |
Note |
|---|---|
|
If the user attempts to assign a name that's in use,
OOF2 will append |
Figure 2.1. Object Organization and Information Flow
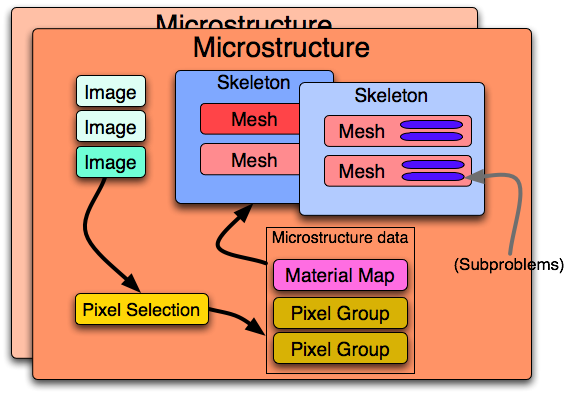
Microstructures
contain Images and Skeletons, and Skeletons contain
Meshes. Microstructures also contain the pixel selection,
pixel groups, and a Material map, which assigns
Materials to pixels. The arrows indicate the flow of
information within the program: pixel selections made on
Images are used to generate the pixel groups and the
Material map. That information is used to create a
Skeleton, from which Meshes are constructed. A Mesh can
be divided into SubProblems.
To completely and unambiguously specify an Image or Skeleton
it's necessary to say which Microstructure it lives in. The
path to such an object is the name of its
Microstructure and the name of the object, separated by a colon. For
example, the path to an Image named
“CrazyAfterAllTheseYears” in a Microstructure named
“Steel”
is “Steel:CrazyAfterAllTheseYears”.
Similarly, the path to a Mesh object is composed of the
names of the Mesh, its Skeleton, and its Skeleton's Microstructure: a
Mesh named “mush” in a Skeleton named
“skill” in a Microstructure named “micro”
is “micro:skill:mush”. The path to a Microstructure is
simply the name of the Microstructure.
When specifying paths in scripts, give the path name in quotation marks. For example:
OOF.Skeleton.Delete(skeleton='micro:bones')
Whenever the GUI needs to know a path, it presents a series of
pull down menus. The top or left hand menu specifies the
Microstructure, then next one specifies the Image or Skeleton,
etc. (See Figure 2.2.)


|
|
|
|
| 1.3. Learning OOF2 |  |
2.2. Microstructures |