OOF2: The Manual
| 3.11. FE Mesh | ||
|---|---|---|

|
Chapter 3. Task Pages |  |
The FE Mesh Page constructs finite element Meshes from Skeletons,
and manages and modifies the Meshes and the SubProblems that
they contain. The layout of the page is shown in Figure 3.19. At the top of the page is the
Mesh Chooser, which determines which Mesh is being operated
upon. Below that are a set of buttons. Below the
buttons are a Mesh Information pane, a Subproblems
pane, and a Mesh
Operations pane, for modifying the current
Mesh.
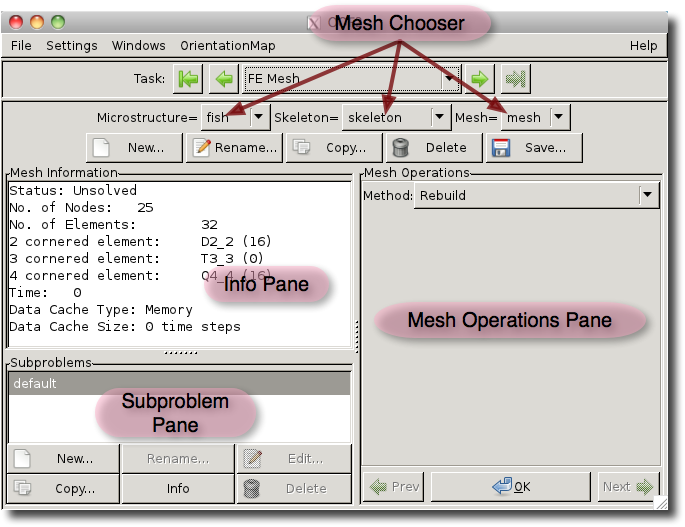
The Mesh Chooser has three components, because to specify a Mesh
it's necessary to specify the Skeleton containing the Mesh and the
Microstructure containing the Skeleton.
The buttons below the Mesh Chooser perform common Mesh
management functions:
-
The button creates a new
Meshin theMicrostructureandSkeletonspecified by the first two parts of the Mesh Chooser. The button brings up a dialog box in which to choose the types of the finite elements used in theMesh. -
The button assigns a new name to the current
Mesh. -
The button makes a copy of the current
Mesh. The copy becomes the new currentMesh. -
The button deletes the current
Mesh. It has no other effect on the currentMesh'sMicrostructureandSkeleton. -
The button saves the current
Meshin a file. It has the same effect as the Save/Mesh command in the File menu, except that it only saves theMeshchosen in the Mesh Chooser.
The Info pane displays information about
the current Mesh, including its current status, its size
(in terms of numbers of Elements, Nodes,
etc.), its current time, and the type
and size of its data
cache.
If the Mesh's Skeleton or Microstructure has been modified, the
Info pane will begin with
Status: Out of sync with Skeleton
***Mesh must be rebuilt! ***
In this situation, many Mesh operations will be unavailable
until the Mesh is rebuilt, using RebuildMesh in the Mesh
Operations pane.
The Subproblems pane manages SubProblems,
which are portions of a Mesh. A Mesh can contain many
SubProblems, which need not be distinct. Fields and
Equations are defined and solved on SubProblems. Using
SubProblems allows different solution techniques to be used on
different Equations, or allows the Fields in one region to
provide boundary conditions for another. For example, the
Temperature Field could be solved for on a PixelGroup
SubProblem which was defined to include all Elements whose
dominant
pixel type includes a specified PixelGroup, while
another Field is solved for on a SubProblem defined to
include only Elements with a given Material.
The top part of the Subproblems pane is a
list of all of the SubProblems defined in the current Mesh.
The list always contains a SubProblem named
default. The
default SubProblem is an EntireMeshSubProblem,
which contains all of the Elements in the Mesh.
Clicking on the name of a SubProblem in the list allows the
buttons below the list to operate on the selected SubProblem.
-
The New button brings up a dialog box for creating a new
SubProblem. The different kinds ofSubProblemsare enumerated in SubProblemType. Each newSubProblemmust have a unique name. Non-unique names will have<x>appended to them, wherexis an integer chosen to make the name unique. -
The Rename button allows you to rename an existing
SubProblem. It is not possible to rename thedefaultSubProblem. -
The Edit button allows you to change the definition of a
SubProblem, either changing the parameters by which it's defined, or changing its type. It is not possible to edit thedefaultsubproblem. -
The Copy button copies the currently selected
SubProblem. It brings up a dialog box to specify a name for the copiedSubProblemand theMeshto which it will be copied (which may be the same as theMeshcontaining the original subproblem). -
The Info button prints information in the Messages Window about the selected
SubProblem. -
The Delete button deletes the selected
SubProblem. It is not possible to delete thedefaultsubproblem.
The Mesh Operations pane works just like
the Modification pane in the Skeleton Page, except
that it doesn't provide as many modification methods, and has no
or
button. (This is because Mesh modifications are stored in a
different way than Skeleton modifications.)
-
The pull-down menu labelled Method selects a MeshModification method. The area immediately below the pull-down menu is for setting the method's parameters, if any.
-
The button applies the selected modifier to the current
Meshby invoking the OOF.Mesh.Modify command. -
The and buttons cycle through the recent
Meshmodification methods. They only reset the pull-down menu and parameters. They don't have any direct effect on theMesh.
|
|
 |
|
| 3.10. Skeleton Boundaries |  |
3.12. Fields & Equations |