OOF2: The Manual
| 3.13. Boundary Conditions | ||
|---|---|---|

|
Chapter 3. Task Pages |  |
The Boundary Conditions Page is where boundary
conditions are applied to the boundaries
of a Mesh. There are a number of prerequisites for applying
boundary conditions:
-
The
Skeletonto which theMeshbelongs must have boundaries defined in it. Boundaries are automatically defined at the exterior edges and corners of allSkeletonswhen they're first created, so this isn't usually a problem. Boundaries cannot be defined directly onMeshes; they must be defined onSkeletons. -
The
Fieldsto which the boundary conditions apply must have been defined in the Fields & Equations Page. -
The
Equationsto which the boundary conditions apply must have been activated in the Equations Page.
The Boundary Conditions Page is shown in Figure 3.21. At the top is the Mesh Chooser,
which selects the Mesh (and the Skeleton and Microstructure in which it
resides) to which boundary
conditions will be added. Below the Chooser is a set of
buttons for manipulating conditions, and below that
is a list of the existing boundary conditions in the Mesh.
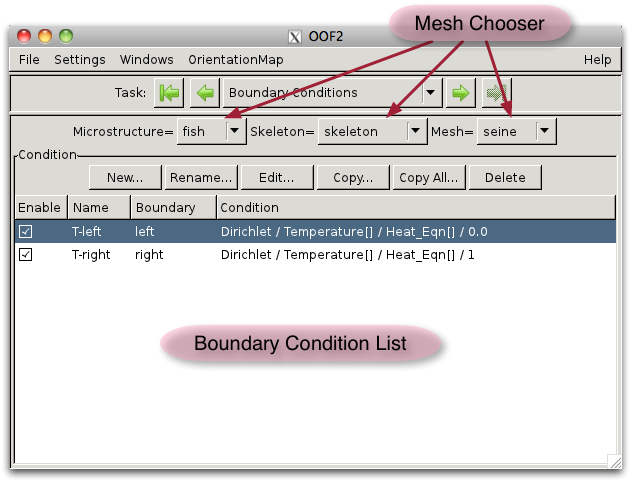
The Boundary Condition Pane lists all of the boundary conditions
assigned to the current Mesh. Clicking on an entry in the
list selects it. Double clicking on an entry is the same as
selecting it and clicking the
button.
The buttons above the list operate on the selected boundary condition.
-
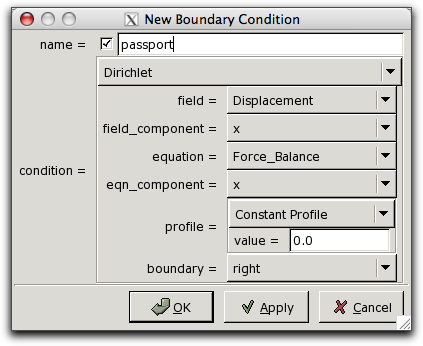
The button creates a new boundary condition. The button brings up a dialog box, shown in Figure 3.22. The button creates a new condition with the specified parameters, and closes the dialog box. The button creates a new boundary condition but does not close the dialog, allowing further conditions to be created. The button closes the box without creating any more boundary conditions. Clicking immediately after will create two identical boundary conditions, which may cause a conflict.
![[Note]](IMAGES/note.png)
Note It is an error to try to solve a
Meshcontaining two Dirichlet or two floating boundary conditions that apply to the same degrees of freedom on the same boundary. Conflicting boundary conditions can be created in the Boundary Conditions page, but the conditions will have to be edited or disabled before theMeshis solved. -
The button renames the currently selected boundary condition.
-
The button brings up a dialog box for editing the currently selected boundary condition. All of its properties other than its name can be changed.
-
The button copies the currently selected boundary condition. It can be copied to another boundary in the same
Mesh, or to anotherMesh. If the current (source)Meshis the same as the destinationMesh, then the copied boundary condition will be automatically selected in the list. -
The button copies all of the boundary conditions from the current
Meshto anotherMeshspecified in a dialog box. -
The button deletes the currently selected boundary condition from the
Mesh.
The first column of the boundary condition list contains
checkboxes that enable
and disable
the boundary conditions. New conditions are automatically
enabled. Disabled conditions will not be used when the Mesh
is solved.
The boundary condition list can be sorted, either by the names of the boundary conditions or by the boundaries to which they're applied, by clicking on the column titles at the top of the list.
|
|
 |
|
| 3.12. Fields & Equations |  |
3.14. Scheduled Output |