OOF2: The Manual
| 6.2.1. OOF.ActiveArea | ||
|---|---|---|

|
6.2. Menus |  |
Active Areas provide a mechanism for restricting the scope of OOF2
operations to a portion of a Microstructure. The Active Area is defined in
terms of a set of pixels, called the “active
pixels”. Pixel operations will be restricted to active
pixels. Operations on Skeleton Nodes will be restricted to Nodes
with positions inside active pixels. Active Skeleton Elements are
defined as Elements with at least one active Node, and active
Skeleton Segments are those with an active Node at either end. Thus
active Elements and Nodes can extend outside the Active Area.
This menu contains commands for manipulating Active Areas. OOF2 maintains a list of previously used Active Areas, so it's possible to go back and reuse old areas. It's also possible to assign names to Active Areas to make it easier to store and recall them.
The GUI tools for manipulating Active Areas are on the Active Area Page.
![[Caution]](IMAGES/caution.png) |
Caution |
|---|---|
|
Not all OOF2 operations respect the Active Area. Most |
Like pixel selections, Active Areas all belong to a particular
Microstructure. Activating pixels in one Microstructure has no effect on pixels
in another Microstructure. It's possible to Copy
an Active Area from one Microstructure to another, though.
Figure 6.1 shows how the Active Area is used
for pixels, Elements, Nodes, and Segments. When an Active Area is
in use, the inactive pixels are dimmed in Image and Microstructure
displays. The
amount of dimming can be adjusted by editing the BitmapOverlayDisplayMethod in the
graphics window.[16]
Figure 6.1. Active Area Examples
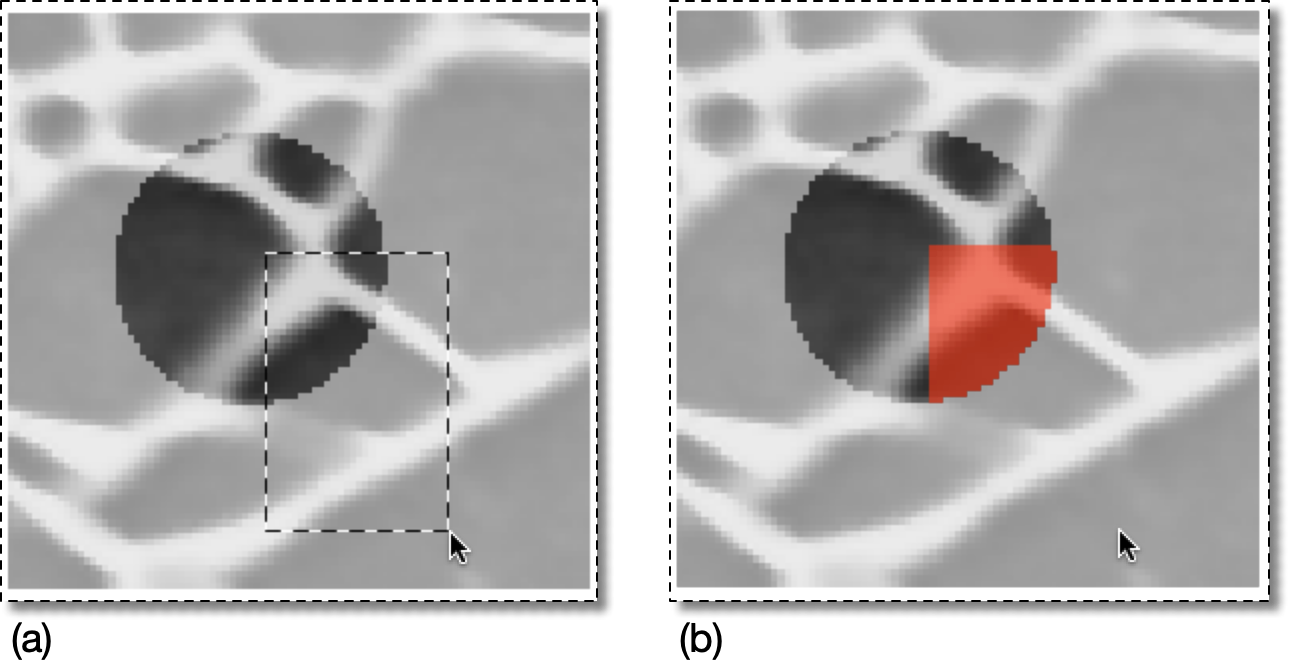
(a) A rectangular pixel selection is being made with the Pixel Selection toolbox on a circular active area. The inactive pixels are dimmed.
(b) Only the pixels within the active area have been selected, although the selection rectangle extended further in (a).
Parent Menu: The Main OOF Menu
OOF.ActiveArea Commands
- OOF.ActiveArea.Activate_All — Activate all pixels.
- OOF.ActiveArea.Activate_Pixel_Group — Activate the pixels in a pixel group.
- OOF.ActiveArea.Activate_Pixel_Group_Only — Activate only the pixels in the given pixel group, deactivating everything else.
- OOF.ActiveArea.Activate_Selection — Activate the the selected pixels.
- OOF.ActiveArea.Activate_Selection_Only — Activate the selected pixels, deactivating everything else.
- OOF.ActiveArea.Copy — Copy the active area from another Microstructure.
- OOF.ActiveArea.Deactivate_Group — Deactivate the pixels in a pixel group.
- OOF.ActiveArea.Deactivate_Selection — Deactivate the selected pixels.
- OOF.ActiveArea.Delete — Delete a stored active area.
- OOF.ActiveArea.Expand — Expand the active area by a given distance.
- OOF.ActiveArea.Invert — Switch active and inactive pixels
- OOF.ActiveArea.Override — Temporarily activate the entire Microstructure.
- OOF.ActiveArea.Redo — Redo the latest undone active area modification.
- OOF.ActiveArea.Rename — Rename the stored active area.
- OOF.ActiveArea.Restore — Restore a named active area.
- OOF.ActiveArea.Shrink — Shrink the active area by a given distance.
- OOF.ActiveArea.Store — Store the current active area.
- OOF.ActiveArea.Undo — Undo the latest active area modification.
[15]
Image modifications do not use the Active Area because
they are mostly implemented by external libraries which
don't know about OOF2 internal structures.
[16]
If you want the dimming to apply to all Layers in the Canvas,
move the Active Area layer to the top of the layer list with OOF.Graphics_n.Layer.Raise.To_Top. This will
produce funny effects, such as partially dimming Elements that have
both active and inactive Nodes.
|
|
 |
|
| 6.2. Menus |  |
OOF.ActiveArea.Activate_All |