OOF: Finite Element Analysis of Microstructures
Automate Dashboard
Synopsis
This dashboard was created to automatically identify features in a particular set of images, an example of which is shown in Figure 3.20. . In the hopes that the technique might be useful for other images, it is described here.
The Automate dashboard was designed for this micrograph and 248 others like it. Image courtesy of M. Kral and G. Spanos, Naval Research Laboratory.
In Figure 3.20. the large grains (austenite) are surrounded by a second phase (cementite). Cementite inclusions also appear inside the austenite grains. The Automate dashboard attempts to assign all of the pixels in the image to one of the two phases, using the fact that the cementite regions are typically long and skinny compared to the austenite grains. Therefore, if a selection operation selects a complete or nearly complete austenite grain, the selection will have a small aspect ratio and a small perimeter ratio (both near one). On the other hand, if it selects a nearly complete cementite inclusion or grain boundary, the aspect ratio will be large, or if the aspect ratio is small, the perimeter ratio will be large. (A long skinny coiled snake can have an aspect ratio near one, but will have a large perimeter ratio.) Because it is harder to select an entire cementite region reliably, when the program identifies a selection as a grain, it immediately assigns it to the austenite phase, but when it identifies a possible grain boundary or inclusion, it defers its assignment until later. After all selections have been made, all pixels not positively identified as austenite are declared to be cementite.
Before using the \menu{Automate} dashboard, the image must be preprocessed with the Modify Image dashboard so that Burn operations at random spots will select pixels in just one of the two phases, and so that complete grains are selected with each burn, insofar as possible. When the GO button is pressed, the program creates two pixel groups, A and B. It then chooses a pixel at random and starts a burn at that pixel. If a specified minimum number of pixels are selected by the burn, and if the shape of the selection satisfies the given constraints on aspect ratio and perimeter, the pixels are assigned to group A. Then another pixel is chosen at random (one that hasn't yet been used to start a burn, and hasn't yet been included in group A). This pixel is used to initiate the next burn, and the process repeats. When all pixels have been either assigned to A or have been used to start a burn, group A is expanded [24] by one pixel in all directions, after which all pixels that aren't in group A are assigned to group B.
Dashboard Components
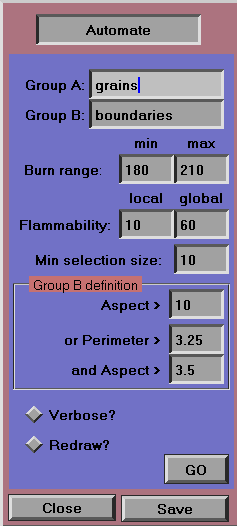
- Group A
-
The name of group A, to which the pixels in the grains will be assigned. Default: grains
- Group B
-
The name of group B, to which the pixels that aren't in the grains will be assigned. Default: boundaries
- Burn Range
-
The algorithm is most efficient if all of the burns start on pixels that will be assigned to group A. These parameters define the set of pixels to be used to initiate burns.
- Flammability
-
Controls the behavior of the iterative burns. See Burn in the Select dashboard for the definitions of the parameters.
- local
-
The local flammability, corresponding to local_flblty in the Select dashboard; Default: 10
- global
-
The global flammability, corresponding to global_flblty in the Select dashboard. Default: 60
- Group B definition
-
The fields in this region determine whether a selected set of pixels is considered for inclusion into group B. If the selection's aspect ratio is greater than a1 or both its perimeter ratio is greater than p2 and its aspect ratio is greater than a2, then the selection is tentatively in group B. Otherwise, it's definitely in group A. Aspect ratio and perimeter ratio are defined in the discussion of the Select dashboard.
- Aspect >
-
The value a1 in the above discussion (the aspect ratio above which a selection will be tentatively assigned to group B, irrespective of its perimeter ratio). Default: 10
- or Perimeter >
-
The value p2 in the above discussion. Default: 3.25
- and Aspect >
-
The value a2 above. Default: 3.5
- Verbose?
-
On/Off switch to control whether loads of information stream through the messages window. Of course, turning off this switch will increase speed.
- Redraw?
-
On/Off switch to control whether the selections will be displayed as they are made. Things run considerably slower when this switch is on, but it is fun [25] and sometimes useful to watch how the selection is working.
- GO
[24] The expansion is required because the Equalize image modification tool tends to produce halos of light pixels at the edges of the grains, which prevent the grains from being completely selected by a burn. The expansion operation ought to be optional here. We promise that it will be, in some later version of the program, if people find the Automate dashboard to be useful.}
[25] We don't get out much.


