OOF: Finite Element Analysis of Microstructures
Select Dashboard
Synopsis
This dashboard is a compendium of pixel selection mechanisms. It contains the primary tools for selecting pixels interactively. Selected pixels may be formed into groups with the /pixelgroups menu and assigned material properties with the /materials menu. They are also used for defining active areas with the /active_area menu. Other non-graphical pixel selection mechanisms may be found in the /select menu.
There are three fundamental methods of selecting pixels:
-
Demography methods group pixels by color, and select all pixels that are similar to a chosen pixel.
-
A pixel Burn is a useful method of selecting pixels that are both alike and contiguous. A burn is initiated by selecting (or igniting, if you please) a pixel and determining whether it will ignite its neighbors. For purposes of selecting contiguous similar pixels, neighbors should ignite only if they are similar.
-
Direct methods just select the pixels that the user chooses.
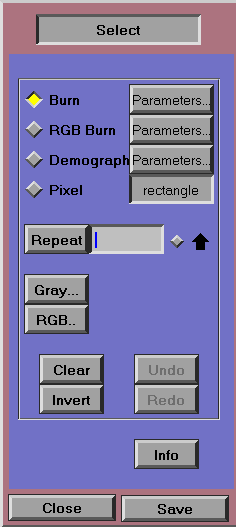
The diamond shaped buttons on the upper left side of the dashboard are used to switch between the graphical selection methods. The button for the current method is highlighted in yellow. These buttons, and their associated Parameters... buttons don't actually make selections--they just determine what will happen when the user clicks the mouse on the image. Shift clicking on the image will add the selected pixels to the previous selection. Clicking without shifting will replace the previous selection.
When clicking on the image, the mouse cursor is a checkmark, and the chosen pixel is under the bottom point of the cursor.
To change the parameters for a selection method, click the Parameters.... A Function Window will appear. Clicking on the title button of the function window will set the parameters, but will not actually make the selection. To do that, you have to click on the image.
Dashboard Components
Interactive selection tools
The graphical selection methods are:
- Burn
-
When this burn method is selected, whether or not the selection spreads from one pixel to another depends on the "color distance" between the pixels. The color distance is the distance in color space, with axes labelled with red, green, and blue values between 0 and 255. The burn is initiated from the pixel that is selected with the mouse. Clicking on the adjacent Parameters button brings up a function window to set the following function parameters:
- local_flmblty
-
If the color distance between of a burned pixel and its neighbor differ by more than this "flammability", then the burn will not propagate to the neighbor. This controls the steepness of the local color gradient along which a burn will propagate. Default: 10
- global_flmblty
-
If the color distance between a target pixel and the initial pixel where the burn started differ by more than this flammability, then the burn will not propagate to the target pixel. This allows a burn to be controlled so that it doesn't propagate along a continuous color gradient. Default: 15
- use_L2_norm
-
This determines how the distance in color space between two pixels is determined. If false, the distance is calculated using the L1 norm. If true, it's calculated using the L2 norm. [20] Using the L2 norm is a bit slower. Default:false
- burn_next_near
-
Determines adjacency conditions for ignition of neighbors. If true, then pixels that touch at corners will also be candidates for burning as well as those that share sides. Default:true
- RGB Burn
-
This is nearly the same as the Burn function described above, but allows for the flammability to be set in each of the RGB values separately. The burn is initiated from the pixel that is selected on the image by the mouse. A pixel will ignite its neighbor if the differences between the red, green, and blue components of the two pixels are all less than or equal to their corresponding flammabilities. Clicking on the adjacent Parameters button allows you to set the following parameters:
- red_flmblty
-
The flammability corresponding to differences in the red values. Default: 10
- green_flmblty
-
The flammability corresponding to differences in the green values. Default: 10
- blue_flmblty
-
The flammability corresponding to differences in the blue values. Default: 10
- burn_next_near
-
Determines whether pixels that share corners are to be considered flammable neighbors. Default: true
- Demography
-
Demography is a method of selecting a set of pixels that are alike, but not necessarily spatially connected or contiguous. When the Demography selection method is activated, a mouse click on the image will select all pixels within the specified color distance (using the L1 norm[20]) of the clicked pixel. Note that finer or precise selection control can be obtained with the manual functions RGB... and Gray....
The Parameters... button allows you to set just one parameter:
- Pixel
-
This provides a mechanism for directly selecting pixels, independent of their color. Clicking and releasing the mouse on the image will select the single pixel under the cursor. Clicking, dragging, and releasing the mouse will select a region whose shape is specified by the pull-down menu to the right. The available shapes are rectangle, circle, ellipse}, and none. Setting the shape to none disables dragging, but still allows for single pixel selection. As always, holding down the shift key toggles the state of the affected pixels.
Immediate Selection Tools
The remaining buttons in the main part of the dashboard make or modify selections immediately, without clicking on the image:
- Repeat/Coordinates/Shift
-
Allows the user to edit the previous selection with the Burn, RGB Burn, or Demography methods. Note that any time a new pixel is selected on the image, that pixel's coordinates are entered into the Coordinates field, and if the shift key is held down while clicking, then the Shift indicator (the diamond next to the vertical arrow) lights up. To repeat a selection, but at a different place or with a different amount of shiftiness, edit the coordinates and/or click the diamond, then hit Repeat. You can repeat a selection with different burn or demography parameters or even with a different method entirely by using the Parameters... buttons or the method buttons, and then hitting Repeat.
You can repeat a single pixel selection made with the Pixel method, but since the Repeat button does not store where the mouse was released, it cannot repeat the selection of a rectangle, circle, or ellipse.
- Gray...
-
This button brings up the Demograyfy function dialog box. Running this function--either by clicking on the function name or by hitting a carriage return in any of the parameter fields--will select all the pixels with gray values within the range specified by the function parameters. That is, Demograyfy works just like Demography, except that it operates on gray values instead of colors, and it takes its initial values from parameters, rather than from the mouse. The gray value of a pixel is the average of its red, green, and blue components. The function parameters are:
- gray_value
-
The midpoint of the selected range of gray values. Default: 125
- plus_or_minus
-
The half-width of the selected range of gray values. A pixel i is selected if |gray_value - grayi| ≤ plus_or_minus. Default: 5
- replace
-
If true, the pixels that are selected by Demograyfy become the only members of the current selected pixel set; if false, the pixels selected by Demograyfy are added to the current selection. Default: true
- RGB...
-
This button brings up the DemoRGB function dialog box. Running this function--either by clicking on the function name or by hitting a carriage return in any of the parameter fields--will select all the pixels with colors similar to the one specified by the function parameters. This function is an extension of Gray... allowing selection control to be specified for the red, green, and blue pixel values independently. A pixel i is selected if |red_value - redi| ≤ +/-_red and |green_value - greeni| \leq +/-_green and |blue_value - bluei| \leq +/-_blue.
- red_value
-
Median red value for pixel selection. Default: 125[21]
- green_value
-
Mean green value for pixel selection. Default: 75[21]
- blue_value
-
Average blue value for pixel selection. Default: 175[21]
- +/-_red
-
Red range used for pixel comparison. Default 27[21]
- +/-_green
-
Green range used for pixel comparison. Default 32[21]
- +/-_blue
-
Blue range used for pixel comparison. Default 12[21]
- replace
-
If true, the pixels that are selected by DemoRGB become the only members of the current selected pixel set; if false, the selected pixels are added to the current selection. Default: true
- Clear
- Invert
-
Put every non-selected pixel into the current selection while removing all selected pixels. In other words, select the closure of the subset of selected pixels.
- Undo
-
Revert back to the previous selection. ppm2oof maintains an unlimited stack of selections.
- Redo
-
Move back up the selection stack if possible. If you've made another selection since you used the Undo command, then you won't be able to Redo the undone command.
Miscellaneous Tools
The final button on the dashboard prints information about the selected pixels:
- Info
-
Prints, in the message window, the number of pixels selected, and the aspect and perimeter ratios of the selection. The aspect and perimeter ratios are used in the Automate Dashboard dashboard.
The aspect ratio is, roughly, the ratio of the length to the width of the smallest rectangular box that encloses the selection. Precisely, it's the square root of the ratio of the eigenvalues of the selection's moment of inertia tensor:
Here i and j are 0 or 1, corresponding to x and y. rk is the position of pixel k, and rik is its i component. The sum over k runs over all pixels in the current selection. 〈 ri〉 is the average of ri over all selected pixels.The perimeter ratio is a measure of what fraction of the pixels in the selection have unselected neighbors. For unfortunate historical reasons, it's defined with an inexplicable prefactor, but it scales as the number of perimeter pixels over the square root of the total number of pixels.
[20] If the colors of pixels i and j are ci=(ri, gi, bi) and cj=(rj, gj, bj), where r, g, and b are the red, green and blue components of the color, then the L1 distance is
The L2 distance is
[21] Don't try to make sense of these default values. We had to put in something, so we made up some numbers.


