OOF: Finite Element Analysis of Microstructures
Next: Color Dashboard Up: The Dashboards Previous: Coordinates Dashboard Contents
Attributes Dashboard
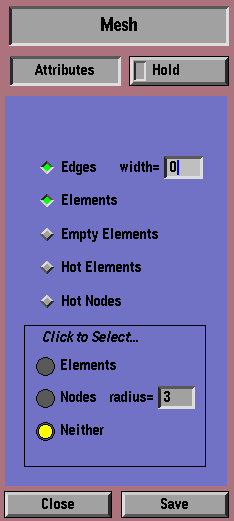 |
The Attributes Dashboard (Figure 5.2) determines which features of the image are visible. It has two forms, depending on whether it's being used in a Mesh Drawer or not. In all cases, it has a bunch of check boxes which can be turned on and off by clicking on them:
- Edges
- Whether or not to draw the edges of the finite elements.
The width (in pixels) of the lines to use can be entered in the width box. A width of 0 does not mean to draw no line, rather it
tells the X server to use the fastest algorithm for drawing a line of
width 1, possibly making a few mistakes.
- Elements
- Whether or not to draw the interiors of the elements.
- Empty Elements
- Whether or not to draw the Empty elements.
Empty elements have a gray value, so they can be drawn in the Mesh Drawer. They always have zero stress when drawn in the Stress Drawers, but they may have non-zero strain. Be aware that
nodes that are only contained in empty elements do not move when the
grid is equilibrated, so the strain may appear to be discontinuous and
the mesh overlapping when empty elements are drawn.
The following check boxes only appear in the Mesh Drawer:
- Hot Elements
- Whether or not to highlight the selected elements.
- Hot Nodes
- Whether or not to highlight the selected nodes. Highlighted nodes. Nodes are highlighted by drawing a small circle on top of them; if there are a lot of nodes, the circles can run into one another and the picture can be very ugly, as well as taking a long time to draw.
In the Mesh Drawer, elements and nodes can be selected with the mouse when the Attributes Dashboard is open. One of the three buttons labeled Click to Select... at the bottom of the Dashboard is always highlighted.
When the Neither button is highlighted, mouse clicks in the Drawing Area are ignored.
When Elements is highlighted, elements can be selected. (Notice that turning on this buttons automatically turns on the Hot Elements check box.) Clicking on a single element in the Drawing Area selects and highlights it while unselecting all others. Holding down the shift key while clicking toggles the selection of the clicked element while leaving all other elements alone. Clicking and dragging the mouse traces out a rectangle, and selects all elements with centers within the rectangle. Holding the shift key while dragging the mouse toggles the selection of all elements within the rectangle.
When Nodes is highlighted under Click to Select..., mouse clicks in the Drawing Area select nodes in a completely analogous way. The radius of the circle used to mark the selected nodes can be set in the box by the Nodes button. Note that when shift-clicking to unselect nodes, the circle does not go away. This is a bug. Use the Redraw button in the Coordinates Dashboard to refresh the image and draw the correct circles.
Next: Color Dashboard Up: The Dashboards Previous: Coordinates Dashboard Contents /* Send mail to the OOF Team *//* Go to the OOF Home Page */