OOF: Finite Element Analysis of Microstructures
Next: Technical Notes Up: The Dashboards Previous: Node Info Dashboard Contents
Cross Section Dashboard
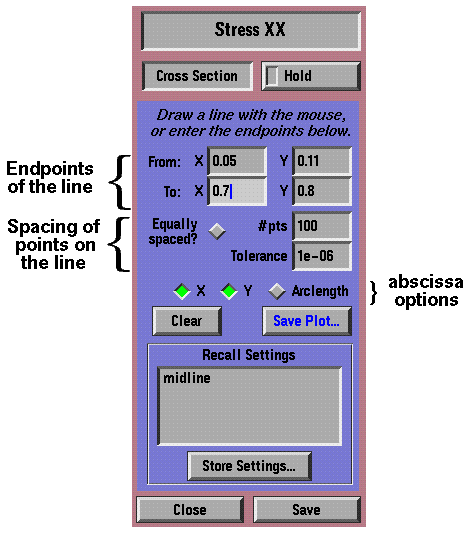
The Cross Section Dashboard is for plotting the value of the displayed function along an arbitrary line in the x-y plane. The plots don't appear on the screen. They are saved in a file, so that you can use your favorite plotting program. The cross section dashboard appears in every Drawer for which it makes sense to plot something. It doesn't appear in the Mesh Drawer.
Clicking and dragging the mouse on the image draws a line on the screen. The function will be plotted along the straight line going from the point where the mouse was clicked to the point where it was released. The endpoints of the line are displayed in the dashboard; they may be edited there.
How the plotted points are distributed along the line is determined by the Equally spaced? button, the #pts value, and the Tolerance. If Equally spaced? is lit, then the specified number of points (#pts) are evenly distributed along the line. If the button is not lit, then points are placed only at the element boundaries, the minimum distance between points will be less than or equal to Tolerance, and #pts is not used. (The functions being plotted are piecewise constant because of the kinds of elements that OOF uses, so the most efficient plot places points only at the discontinuities.)
The three buttons marked X, Y, and Arclength control what is plotted in addition to the function values. Arclength is the distance from the starting point of the plot. Positions are measured in the coordinate system of the image, so if you want them to be in the coordinate system of the undistorted system, make sure to set enhancement (Sec. 3.9.3) to zero.
The Clear button removes the plot line from the image and clears the input fields for the endpoints.
The Save Plot... button brings up a file selector and saves the data points in the specified file.
The current settings (endpoints, number of points, etc.) can be stored by clicking on the Store Settings... button. A window will appear asking you to give a name to the set of settings, and that name will appear in the list entitled Recall Settings. Clicking on a name in that list will restore the settings. The set of saved settings is shared among all Drawers in all Graphics Windows. Storing and recalling settings is the easiest way to copy them from one Drawer to another.
Next: Technical Notes Up: The Dashboards Previous: Node Info Dashboard Contents /* Send mail to the OOF Team *//* Go to the OOF Home Page */